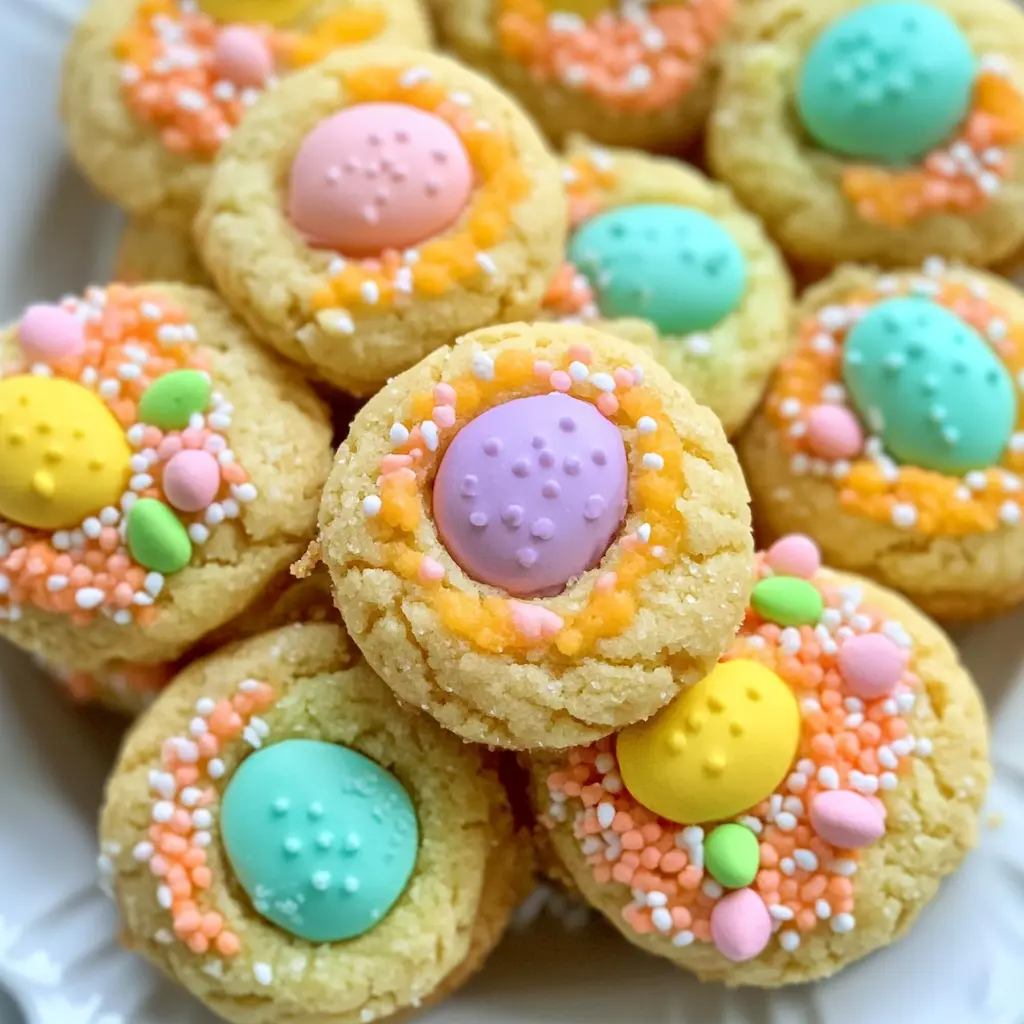
Oh, Easter! It’s one of my favorite times of year, not just because of the blooming flowers and the hunt for hidden eggs, but also because of one of the most delightful treats that comes around—Easter Thumbprint Cookies! These cookies have an irresistible combination of a buttery base, a colorful sprinkle coating, and a sweet, tart filling that just makes my heart sing. I remember the first time I baked them with my little cousin—her face lit up with joy as we filled those little indents with lemon curd. It’s a memory I cherish, and I think that’s what makes these cookies even more special; they’re perfect for sharing, creating memories, and spreading some Easter joy.
Now, let me take you through this joyous baking journey step by step. Whether you’re making them for an Easter brunch or just because, these cookies are sure to elicit smiles from everyone at the table!
What’s in Easter Thumbprint Cookies?
Let’s break down the ingredients that make these cookies truly magical.
Unsalted Butter: The star of our show! Softened, it creates that wonderful creamy base. Make sure it’s at room temperature for easier mixing, just as grandma taught me.
Granulated Sugar and Brown Sugar: A combination of both gives these cookies the perfect sweetness. Brunette sugar adds that lovely hint of caramel flavor, which is totally irresistible.
Eggs: Vital for binding our ingredients together and adding moisture. I like to use large eggs for the best results.
Vanilla Extract: This magical ingredient enhances the flavor profile. Honestly, a splash of good quality vanilla makes a world of difference.
All-Purpose Flour: The foundation of our cookies. Make sure you measure it properly. I like to fluff it up with a spoon first before scooping to avoid densely packed flour.
Baking Powder: This will help our cookies rise slightly and achieve that perfectly soft and chewy texture.
Salt: Just a pinch for balance. Salt brings out all the flavors beautifully.
Colorful Sprinkles: These add fun and festivity! You can go wild with different colors and shapes—totally up to you!
Lemon Curd (or preferred filling): This is what adds the “thumbprint” to our cookies! I’m a lemon curd fanatic, but feel free to swap it out for raspberry jam or any sweet filling you love.
Is Easter Thumbprint Cookies Good for You?
Now, let’s talk about the health aspect. While we can’t exactly label these as health food, they do have some enticing qualities!
Unsalted Butter: It contains vitamins A and D which are necessary for our body. Of course, moderation is key.
Eggs: A great source of protein! They help promote muscle growth and keep you feeling full longer.
However, with all that sugar and butter, we should indulge in these cookies in moderation. Enjoying treats like this can conjure up feelings of happiness and nostalgia, which is truly good for the soul!
Ingredients List
Here’s what you’ll need to whip up these delightful Easter Thumbprint Cookies (makes about 24 cookies):
– 1 cup unsalted butter, softened
– 2/3 cup granulated sugar
– 1/3 cup brown sugar, packed
– 2 large eggs
– 2 teaspoons vanilla extract
– 3 cups all-purpose flour
– 1 teaspoon baking powder
– 1/2 teaspoon salt
– 1 cup colorful sprinkles
– 1 cup lemon curd (or any desired filling)
How to Make Easter Thumbprint Cookies?
Ready to get your bake on? Here we go!
1. Preheat your oven to 350°F (175°C). Line a baking sheet with parchment paper—this will make cleanup a breeze!
2. In a large mixing bowl, cream together the softened butter, granulated sugar, and brown sugar until light and fluffy. You want it to look like fluffy clouds!
3. Add the eggs, one at a time, mixing well after each addition. Then stir in the vanilla extract. This is where the magic happens!
4. In another bowl, whisk together the all-purpose flour, baking powder, and salt.
5. Gradually add the dry mixture to the wet mixture, mixing until just combined. Don’t overmix; we want those cookies to remain tender!
6. Scoop the cookie dough (about 1 tablespoon each) and roll them into balls.
7. Roll each cookie dough ball in colorful sprinkles until fully coated—let those colors shine!
8. Place the sprinkle-coated cookie balls on the prepared baking sheet, leaving some space between them.
9. Using your thumb, create a deep indent in the center of each cookie. It’s the most fun step, trust me!
10. Bake in the preheated oven for about 10-12 minutes or until the edges are lightly golden. Your kitchen will smell heavenly at this point!
11. Remove from the oven and allow to cool slightly before filling each indentation with lemon curd (or your filling of choice).
12. Allow the cookies to cool completely on a wire rack before serving.
You did it! You’re on your way to cookie heaven.
Sprinkle Some Extra Joy!
– If you want to get a little fancy, consider switching up the filling with other fruit jams or chocolate ganache for a surprising twist.
– These cookies are perfect for decorating! Try adding a drizzle of melted white chocolate or more colorful sprinkles on top for added flair.
– Store in an airtight container to keep them fresh—or, let’s be honest, they probably won’t last long!
I hope you give these delightful Easter Thumbprint Cookies a try! Bake them up and let all your loved ones enjoy these sweet treats, especially during this joyous festive season. And please, share your experiences with me! I can’t wait to hear how they turn out for you! Happy baking!